| Home | Networking | Remote Access | Software | Security | Services | Support | ||||||||||||||||||||||
|
|||||||||||||||||||||||||||||||||||||||||||||||||||||||||||||||||||||||||||||||||||||||||||||||||||||||||||||||||||||
|
|
||||
| Configuring Windows NT 4.0 for PPP The following are instructions for configuring Windows NT version 4 to work with the Point-to-Point Protocol used for dialup connections with SUnet. To follow these instructions you should already have a Leland account, the necessary equipment, and Windows software installed on your PC. You may need access to your Windows NT CD in order to copy some necessary files. |
||||
|
|
||||
| Install the TCP/IP Network Protocol | ||||
Make sure you have TCP/IP listed as one of the installed network protocols. To do so, open the "Network" Control Panel by right-click on the "Network Neighborhood" icon and selecting "Properties" from the pop-up menu. Click on the protocols tab to see alist of the network protocols installed in Windows NT. |
||||
| If you don't see TCP/IP listed, do this:
Click the "Add" button. This will bring up a dialog box with a list of protocols available for NT 4.0. Select the TCP/IP protocol from the list of protocols and click the "OK" button. You may be prompted to insert your Windows NT installation disks and restart the computer. |
||||
| Configure the TCP/IP Network Protocol | ||||
Open the "Network" control panel (Start Menu -> Control Panel). Pick the "Protocols" tab from the upper portion of the dialog box. Double click the "TCP/IP" Protocol. This will bring up the following dialog box: |
||||
 "MICROSOFT TCP/IP PROPERTIES" (STANFORD) |
||||
| In the "IP Address" tabbed box, verify that the "Obtain and IP Address from the Server" option button is selected.
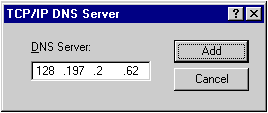
Click on the "WINS address" tab. Verify that the "Enable DNS for Windows Resolution" option is selected. Click on the "Routing" tab. Verify that the "Enable IP Forwarding" check box is selected. Click the "DNS" tab and fill in the fields here as seen in the image above. In the "Host Name" field simply enter a period. To add the DNS server IP address in the "DNS Search Order" field click the "Add" button and enter the following three addresses: 171.64.7.55 Click the "Add" button in this smaller dialog box after each server IP address: |
||||
 |
||||
Click "OK" to finish the configuration process. Click "Yes" when Windows NT prompts you to restart your PC. |
||||
| Configuring the PhoneBook/Dial-Up Networking | ||||
Double-click the "My Computer" icon, then "Dial-Up Networking". If this is the first time you open the "Dial-Up Networking" wizard you will see a dialog indicating that you have not made any phonebook entries. Click OK and a new phone wizard will appear. If you don't have a modem installed under NT, you may be prompted to set up your modem. On the first screen, select "I know all about phonebook entries and would rather edit the settings directly". Click Next. You'll get a tabbed document named "New Phonebook Entry". In the "Basic" tab, fill in the fields as in the screenshot below: |
||||
 |
||||
| Add the area code before the phone number if you are dialing from outside the 650 area code. For "Dial Using", select your modem model. Check your user manual or modem manual to determine your modem name.
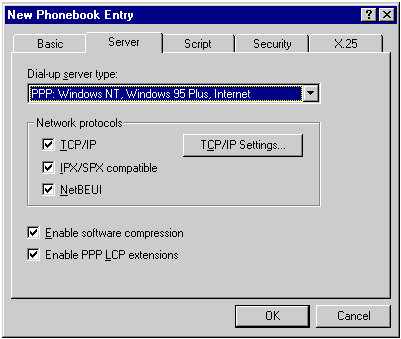
In the "Server" tab, select the "Dial-up server type" and fill in the check-boxes exactly as shown below: |
||||
 |
||||
| In the "Script" tab, verify the "None" option button is selected.
Leave the "Security" and "X.25" tabs unchanged. Click "OK". |
||||
| Dialing in to SUNet | ||||
You should now have the Dial-Up Networking dialog with a "Dial" button: (If you don't have this dialog on your screen, open the "Dial-Up Networking" folder within "My Computer" and double-click on the "Stanford PPP" icon.) |
||||
 |
||||
|
When you click the "Dial" button, you will get a "Connect to Stanford PPP" dialog as shown below:
|
||||
 |
||||
In the user field, enter your SUNet ID (if for, example, your email address is jdoe@leland.stanford.edu, then your SUNet ID is jdoe). Enter the SUNet password in the "Password:" field. If you don't want to enter your password each time you dial select the box "Save Password". Click "OK". After Windows NT authenticates your username and password, you will see a window indicating that you have sucessfully connected to the network. Click "OK" to close the box (closing the box does not terminate your connection). While you are connected you will also see a Dial-up Networking monitor in the form of a small icon near your system clock: |
||||
|
|
||||
| Now that you are connected you can run internet applications such as Netscape Navigator, Eudora Pro and, PC-Leland, and Samson for Windows. |
||||
| Terminating your PPP Session | ||||
|
When you are ready to disconnect your phone connection to end your internet session right-click on the Dial-Up networking monitor (the small telephone icon to the left of the system clock, shown in the picture above) and Select "Hang Up" from the menu. |
||||
|
|
||||
| Getting Additional Help | ||||
If you have difficulty with any aspect of getting or using PPP, your best source of help is Stanford's su.computers.dialin newsgroup, the main forum for the exchange of data about PPP and other areas of our dial-in service. You can use this newsgroup to ask and answer questions, tell others of useful solutions you have discovered, and find out about any new or upgraded services being offered. There are many different ways to read and post messages to the newsgroup. An alternate way to submit a query is to send electronic mail messages to su-computers-dialin@news.stanford.edu, which will forward your messages to the newsgroup. As always, include your electronic mail address so responses can, if you wish, be sent directly to you. You can also contact ITSS Customer Assistance via HelpSU for consulting help. For additional help, contact your dormitory's Resident Computer Coordinator (RCC) or your department's Local Network Administrator (LNA). |
||||
|
Last Updated: Monday, December 21, 1998 |
||||