| Home | Networking | Remote Access | Software | Security | Services | Support | ||||||||||||||||||||||
|
|||||||||||||||||||||||||||||||||||||||||||||||||||||||||||||||||||||||||||||||||||||||||||||||||||||||||||||||||||||
|
|
||||
| Configuring Your Macintosh for Appletalk The following are instructions for creating shared folder on your Macintosh. You can specify who will have access to each folder, and whether a user will be able to read, copy, or modify the files within this folder. To follow these instructions you should already have Open Transport or MacTCP software configured on your Macintosh computer. Your computer should already be able to read email and surf the WWW using Netscape or Internet Explorer. You should verify that your Appletalk connection is working and filesharing is enabled. |
||||
|
|
||||
| Set Up a User Account | ||||
Since you will be creating a shared folder, wouldn't it be nice to specify who can see and make changes to its contents? Create a user account. You can then bind the sharing properties of a folder so that only people you specify will have access to that folder's contents. |
||||
| Creating a User Account:
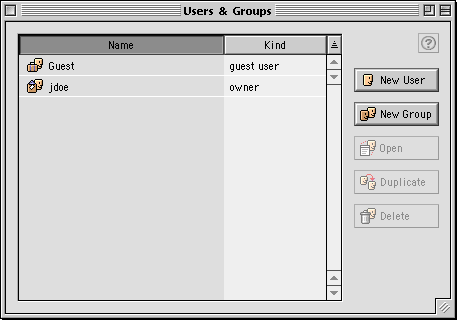
System 8.x Users: Select "Users and Groups" from the "Control Panels" option in the Apple menu: |
||||
 |
||||
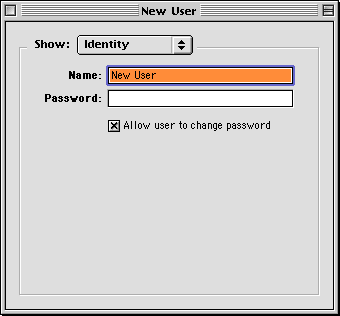
| This is the user manager window. From this window you can create new and delete new users. To create a new user, click on the "New User" button: | ||||
 |
||||
| For the "Name:" field, type the username you would like users of your shared folder to logon with. For the "Password:" field, enter the password (case sensitive) the user should use.
When you are finished, close the window. And exit the "User & Groups" control panel window. You need to give the username and password information to whomever you would to have access to the shared folder. |
||||
| Create a New Folder or Select a Folder for Sharing | ||||
Select or create a new folder to share: |
||||
 |
||||
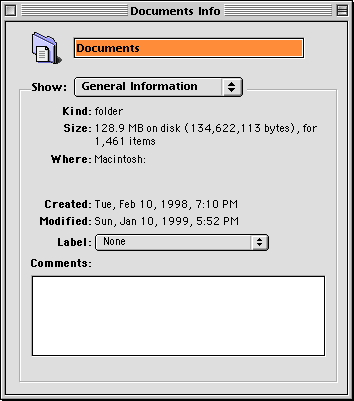
| In this example, I'm going to share my "Documents" folder.
While the highlighting the to-be-shared folder, select "Get Info" from the "File" menu: |
||||
 |
||||
| Click on the pop-up menu that says "General Information" in the "Get Info" window: | ||||
 Figure A. |
||||
| Select the "Share this item and its contents" option (the box to the left should contain an 'x' or check mark if enabled).
The options in the lower area of the window below are "Owner:" (you can specify the owner, selected from a list of users in the "User & Groups" control panel, by choosing a name from the pop-up menu to the right of the word "Owner:" in the "Name" column), "User/Group:", and "Everyone". The icons under the "Privilege" column specify what the user specified for "Owner", "User/Group", and "Everyone" will be able to do with the folder. |
||||
 |
||||
| "Read & Write" privileges let the user view and modify document in the shared folder. "Read Only" gives the user the ability to view the file and copu it to their own Macintosh for editing (the user can not add documents to the shared folder). "Write only" priveleges let the user drop a document into the shared folder for submission without viewing the contents of the folder. Any user with the "None" privilege can neither view nor modify documents in the folder.
In Figure A, above, I have given the user "jdoe" full access to the contents of the "Documents" folder. Everyone else will not even see the folder when accessing my computer remotely After you have selected the users and their priveleges, close the sharing window. Your folder is now shareable only with the users you have specified. |
||||
|
Last Updated: Monday, December 21, 1998 |
||||