
| Home | Networking | Remote Access | Software | Security | Services | Support | ||||||||||||||||||||||
 |
|||||||||||||||||||||||||||||||||||||||||||||||||||||||||||||||||||||||||||||||||||||||||||||||||||||||||||||||||||||
|
|||||||||||||||||||||||||||||||||||||||||||||||||||||||||||||||||||||||||||||||||||||||||||||||||||||||||||||||||||||
|
|
||||
| Configuring Windows NT's TCP/IP Stack for Ethernet The following are instructions for configuring Windows NT TCP/IP to work with ethernet connections at Stanford University. To follow these instructions you should already have a Leland account, an ethernet card, and TCP/IP and ethernet driver software installed on your PC. Your computer must have already been registered by MedISG for these directions to have any effect (Register my computer with MedISG). |
||||
|
|
||||
| Configuring the TCP/IP Control Panel | ||||
From the "Start" menu select "Settings" then "Control Panel". In the "Control Panel" window double-click the icon titled "Network". You will see this screen (note that the "Identification" tab is selected): |
||||
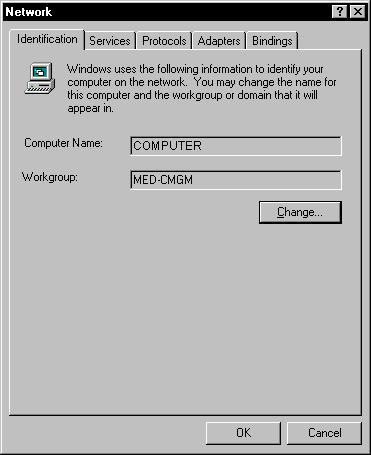 Figure A |
||||
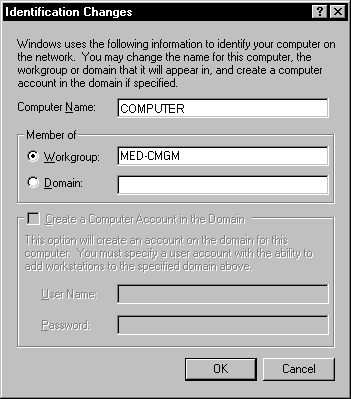
| Press the "Change" button to modify the computer name and workgroup: | ||||
 |
||||
| In the "Computer Name:" field enter the name of your computer as you specified in the Registration Form. If you are installing your own personal computer, consider using your CMGM user name (user_name@cmgm.stanford.edu) for the "Computer Name:" field.
The computer name entered in the "Computer Name:" field should match the text entered in the "Host:" field of the TCP/IP DNS Properties window (shown further below in Figure B.). Select the "Workgroup" radio button and enter the workgroup name. An appropriate workgroup name can be the room number or the name of the professor who runs the lab where the computer is located. |
||||
 |
||||
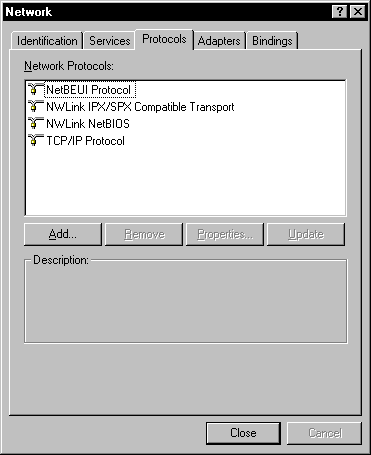
| Select the "Protocols" tab at the top of the "Network" window and verify that the "TCP/IP" protocol is present.
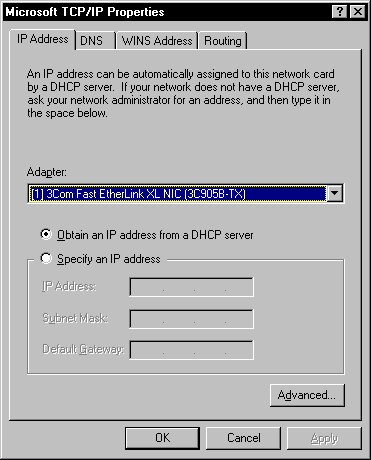
Select the "TCP/IP" protocol and click the "Properties" button. In the new window (titled "Microsoft TCP/IP Properties"), select the tab near the top of the window marked "IP Address": |
||||
 |
||||
| Select the radio button labeled "Obtain an IP address automatically". Verify that your ethernet device is listed in the pull-down menu below the "Adapter:" field.
Click once on the tab titled "DNS Configuration": |
||||
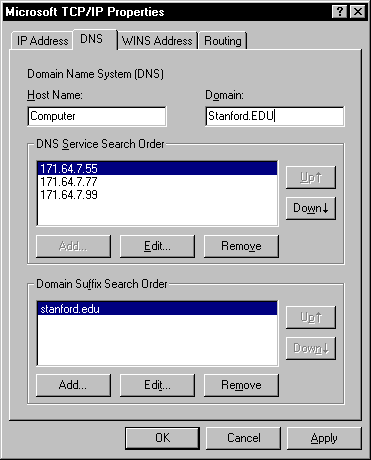 Figure B |
||||
| In the "Host:" field enter the name of your computer as you specified in the Registration Form. If you are installing your own personal computer, consider using your CMGM user name (user_name@cmgm.stanford.edu) for the "Host:" field.
The text entered in the "Host:" field in the screen above should match the computer name entered in the "Computer Name:" field of the Network Identification window (shown above in Figure A). In the "Domain:" field enter "Stanford.EDU" (case sensitive). In the field directly below "DNS Server Search Order" click the "Add" button and enter the following three sets of numbers, in this order: 171.64.7.55 Press the "Add" button after entering each set so that they appear in the field below the words "DNS Service Search Order" (and directly above the words "Domain Suffix Search Order". Enter "Stanford.EDU" in the field below "Domain Suffix Search Order" and click the "Add" button. Select the tab titled "WINS Address" from the top of the window: |
||||
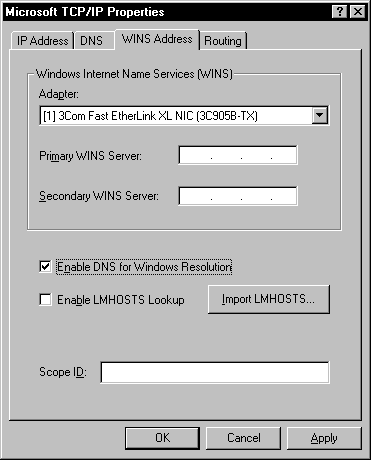 |
||||
| Leave the the "Primary WINS Server:" and "Secondary WINS Server:" fields blank.
Verify the option titled "Enable DNS for Windows Resolution" is selected (with a check mark). The item titled "Enable LMHOSTS Lookup" should be deselected. Click the "OK" button to save your settings, then select the "Close" button to close the "Network Properties" dialog box. Select "Yes" when prompted to restart your PC. |
||||
| Using Ethernet | ||||
Unlike the modem dial-in internet connection, ethernet does not require you to make a connection before use. You may simply load an application (such as Netscape, Internet Explorer, or Telnet) and your PC will automatically open the TCP/IP connection. |
||||
|
|
||||
| Getting Additional Help | ||||
For additional help your department's Local Network Administrator (LNA). |
||||
|
Last Updated: Monday, December 21, 1998 |
||||